How To Make Your Own Body Lotion Without Beeswax
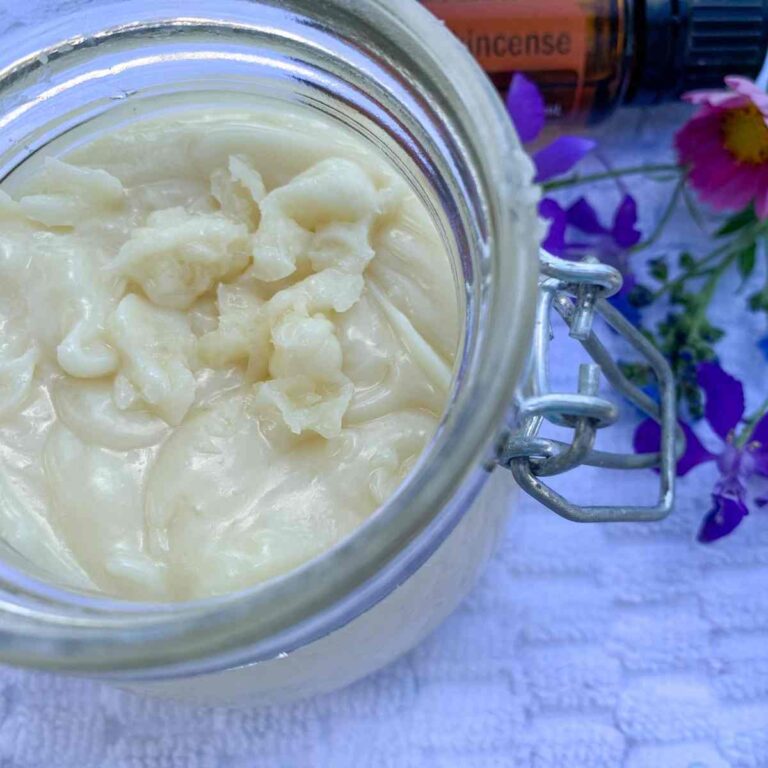
This isn’t a recipe for DIY lotion without beeswax, but more of a guide to help you create your own recipe that’s perfect for your skin. You can use it as a starting point and then customize it by choosing ingredients that you like and that work well for you. It’s all about experimenting and finding what feels best for your skin. So feel free to mix and match ingredients until you find the perfect combination. Have fun and enjoy making your own personalized lotion!

Chemical fragrances and preservatives can really hurt delicate skin. Instead, I use ingredients like shea butter, cocoa butter, and jojoba oil. These natural ingredients deeply nourish the skin without causing irritation. And the best part? I know exactly what goes into each bottle, which gives me peace of mind that I’m keeping my family safe from harmful toxins while also improving our skincare.
Tools and Ingredients you Need to DIY Lotion Without Beeswax
Here’s a simple list of essential tools and ingredients you’ll need to make your own lotion at home:
Tools:
- Double boiler or heat-safe glass bowl and pot to boil water in.
- Mixing utensils (spoons, spatulas).
- Hand mixer or blender.
- Measuring cups and spoons.
- Clean containers for storing the lotion such as glass jars or pump bottles.
As an Amazon Associate I earn from qualifying purchases. This post contains affiliate links which means I make a small commission at no extra cost to you. See my full disclosure and privacy policy.

Ingredients:
- Shea butter
- Cocoa butter
- Carrier oils (jojoba oil, sweet almond oil, coconut oil)
- An alternative emulsifier such as candelilla wax. If you would rather not use any kind of wax, check out my recipe for cocoa body butter.
- Distilled water or floral waters like rose water
- Optional: Essential oils for fragrance (make sure they’re skin-safe)
- Vitamin E oil or other antioxidants for added skin benefits
With these tools and ingredients, you’ll be all set to create your own homemade lotion!
Simple Steps to DIY Lotion Without Beeswax
Here’s a simple step-by-step guide to making your own lotion without beeswax:
- Gather Your Ingredients: Get your shea butter and cocoa butter ready. These are great for keeping your skin moisturized.
- Set Up Your Kitchen Working Area: Use a glass bowl over a pot of simmering water or a double boiler. This setup helps melt and mix your ingredients safely.
- Prepare the Oil Phase: Mix jojoba oil and olive oil in the glass bowl. These oils are full of good stuff for your skin. Heat them gently until they’re well blended.
- Get the Water Ready: In another pot, heat distilled water with a bit of rose water for a nice smell. Keep it simmering gently.
- Combine Oil and Water: Carefully mix the oil mixture with the water. Use a hand mixer to blend them until you get a creamy texture. Take your time with this step.
- Cool Down: Let your lotion cool to room temperature. This helps it stay stable and prevents it from separating.
- Transfer to a Bottle: Once it’s cooled down, pour your homemade lotion into a pump bottle.
- Enjoy and Store: Your homemade lotion should last a while. Store it properly ( I like to keep mine in the fridge) and enjoy the benefits of your DIY lotion!
Knowing Your Skin Type
Making my own natural recipe taught me how important it is to use the right ingredients for different skin types. Shea butter and sweet almond oil are great for dry skin because they’re really moisturizing but don’t make your skin feel oily. If you have sensitive skin, jojoba and avocado oils are gentle and won’t irritate your skin.
If your skin gets oily, grapeseed oil is perfect because it’s light and helps control oil. Adding rose water can also make your lotion better by reducing skin redness. By picking the right oils and butters, anyone can make a homemade lotion that’s just right for their skin, without feeling greasy.
Other Options Besides Beeswax for your DIY Lotion
Some people choose not to use beeswax in their diy lotion recipe for a few reasons:
Some prefer not to use it because it comes from bees, and they want to avoid using animal products in their skincare. They care about the well-being of bees and don’t want to support industries that might harm them.
For others, beeswax can cause allergic reactions or skin sensitivities. They might have itchy or irritated skin after using body creams with beeswax.
Some people might not like the texture it gives to lotions or prefer the feel of a different natural product instead.

Here are a few alternatives to beeswax
Candelilla Wax: It comes from a plant called candelilla. Like beeswax, it helps thicken lotions and is vegan-friendly.
Jojoba Wax: This is basically hydrogenated jojoba oil. It kind of feels like little beads and if not completly melted give the lotion an exfoliation feel.
Carnauba Wax: This wax is from a type of palm tree. It’s hard and shiny and helps keep lotions stable.
Making your own natural moisturizer: Choosing Oils and Butters For Your Skin Type
Choosing the right oils and butters is super important when you’re making your own lotion. For example, if you have dry skin, you might want to use shea butter or mango butter because they’re really moisturizing. But if you have oily skin or a combination like mine, jojoba oil could be a great option because it’s similar to the natural oils our skin makes, so it helps balance things out.
And if your skin feels dry sometimes, like mine does in the winter months, avocado oil is awesome because it’s super hydrating. The cool thing is, you can mix and match these ingredients to make a natural lotion that’s perfect for your skin. If you need more moisture, you can add more hydrating stuff. And if you want something lighter, you can keep it simple with less ingredients.
Once you figure out what works best for your skin, you can customize your lotion to make it just right for you. It’s like a fun experiment, and it’s all about finding what makes your skin feel happy and healthy.
Adding Natural Scents to Your Lotion

Let me show you how to add natural scents to your lotion in an easy way. First, you’ll need essential oils.
For a calming feel, you can add a few drops of lavender or chamomile essential oil to your homemade lotion. It’s great for using in the evening before bed.
If you want to feel energized in the mornings, try adding citrus oils like grapefruit or sweet orange. They’ll wake up your senses and make your skin feel refreshed for the day. But just keep in mind that if you use citrus oils you need to stay out of direct sunlight for at least an hour because these oils can make your skin more sensitive to sunlight. Citrus oils, like lemon, lime, grapefruit, and orange, contain compounds that can react with sunlight and cause a skin reaction called photosensitivity.
But here’s the trick: essential oils are super strong, so you only need a little bit. Using too much can irritate your skin. So, start with just a few drops (two or three) and see how it smells. You can always add more later if you want a stronger scent.
It might take some practice to get the right balance, but it’s worth it. Soon, you’ll have your own personalized skincare products with lovely natural scents, and they won’t make your skin feel greasy at all.
Preserving Your DIY Lotion Without Beeswax
how to keep your homemade lotion fresh without using harsh chemicals.
One trick I learned is to add some vitamin E oil to the mixture. This oil has natural stuff in it that stops the lotion from going bad too quickly. It’s like a superhero for keeping things fresh!
Another thing you can do is add grapefruit seed extract. This acts like a protector against germs, so your lotion stays clean and doesn’t get all yucky.
Now, when it comes to storing your lotion, you want to keep it in a cool place away from sunlight. I like to keep mine in the fridge. If you need an excuse to buy one those cute little cosmetic fridges here it is! Lol

Sunlight can make the lotion go bad faster, so it’s best to keep it in a dark cabinet or shelf. Also, using dark glass containers like pump bottles helps keep air out, which stops germs from getting in and making your lotion go bad.
By following these tips, I’ve been able to enjoy my homemade lotion without worrying about it going bad. It stays fresh and works just as well as the day I made it!
Tips for First-Timers
Making your own lotions might feel overwhelming at first, but don’t worry, I’ve been there too! I’ve had batches of lotion not turn out right—some were too thick or separated weirdly. But I learned some helpful tips along the way to make it easier.
If your lotion looks like oil and water aren’t getting along, it’s probably because they’re not at the same temperature. Make sure the oil and water parts of your lotion are both warm before mixing them together. This helps them blend nicely and stay together, so your lotion turns out smooth and perfect.
And if your lotion ends up too thick, like body butter, don’t panic! Just add a little bit of warm distilled water and mix it in carefully. Remember, it’s better to start with less water and add more if you need to.
Most importantly, be patient! Making your own skincare products, like this natural moisturizer, can be really rewarding. And sometimes it will take you two, three, or four times before it turns out just right. Enjoy the process and take pride in using something you made yourself, just for you and your family.
Make The Investment to a Better Way to Take Care of Your Skin
When you start making homemade lotions, there is an initial investment in buying the ingredients. You’ll need things like shea butter, oils, and maybe some special extras like essential oils. But here’s the cool part: once you have those ingredients, you can make a lot of batches of lotion with them. You won’t have to buy those ingredients again for a while, so each batch of lotion you make ends up being way cheaper than buying a similar product from the store.
Over time, making your own lotion actually saves you money, even though you might spend a bit more upfront. Plus, you get the satisfaction of knowing exactly what’s in your skincare products and customizing them to your skin needs. It’s a win-win situation!
Making your own natural skincare at home is a great idea for lots of reasons. First off, you get to control what goes into your skincare products, so you can avoid chemicals and use ingredients that are good for your skin. Plus, it can be fun to experiment and find the perfect combination of ingredients that work best for you.
Making your own skincare can also save you money in the long run, since homemade products are often cheaper than store-bought ones.
How To Make DIY Lotion Without Beeswax


After you’ve made your own lotion, you might want to gift some to your friends and family.
So, you’ve made your own lotion, and now you might be thinking about sharing it with others. It’s a great idea! I started by making small batches for my family using simple ingredients. They loved getting homemade creams as gifts because they knew it was made with care just for them.
During the holidays, giving homemade lotion as gifts is a wonderful idea! You can make special batches . It’s a thoughtful present that shows you care about the person’s well-being. Plus, you can add different scents like cocoa butter and peppermint to make it extra festive. Everyone loves receiving homemade gifts, especially when they’re made with love and natural ingredients. It’s a simple way to spread joy and cheer during the holiday season!


